Sunday, August 16, 2009

Creating a special birthday cake


No recipe for this cake. I was tasked with taking the cake to my brother in law's lunch to celebrate his 50th birthday so this was my creation. I will try and remember - it was a while ago in June. I actually hand drew some plans for this cake on some parchment and drew a cross section of it and everything. I gave the plan to Kevin so its such a shame I didn't take a photograph of the plan for this post.
Paul and Elliot asked why I did the plan and I said I just love a touch of whimsy and luckily so did Kevin and Leanne who are going to frame the plan.
The cake is two discs of almond meringue covered with kahlua cream and sandwiched between two layers of chocolate and coffee cake - then the whole cake is covered with a dark chocolate ganache. It took me ages to decide what to make and loads of internet research and I was inspired so many of the Daring Bakers out there. I simply cannot remember which chocolate cake recipe I used in the end. It is truly a one of a kind cake for a special person.


Chewy Chocolate chip cookies - dark chocolate and cranberry and white chocolate and macadamia


1 and a half cups of plain flour
1/2 to 3/4 cup cocoa powder
1 tsp baking soda
1/2 tsp salt

cup brown sugar firmly packed
1/2 cup castor sugar

175 grams of butter (room temperature - but still firm)
1 egg and 1 egg yolk beaten

100 grams chocolate chunks
100 grams chocolate chips
50 grams dried cranberries

Heat oven to 160degrees and place rack in bottom 3rd of the oven - mine is just below the middle.

Cream butter and sugar on slow for about 3 mins do not overbeat - I read it makes a difference! Add the beaten egg and yolk and beat till combined again but once combined stop. I have read that overbeating may affect the mixture so I stopped when I considered that the additions were combined well in.

Sift plain flour, cocoa, salt, baking soda together and add to this mixture to the creamed butter, sugar and eggs and on slow combine.

With a wooden spoon stir in chocolate and cranberries. Drop large dessert spoonfuls on baking trays lined with baking paper - I only do four at a time to allow for spreading.

They seem to take about 14 mins to cook in my oven. For the first 7 mins I cook them on the higher tray and then move them to the lower tray for the final 7 mins. When moving them in I put the second tray on top.

The cookies should spread and look a little harder around the edges and not be too soft when you remove them from the oven. Let them cool for about 5 mins on tray before moving to a rack. If you turn them over and the just seem to be undercooked you can pop them back into the oven for a couple more minutes but watch them carefully this is often the difference between soft and chewy and crisp.

For white chocolate and macadamia cookies
Use 2 cups of plain flour (omit the cocoa - but I am going to try a cocoa version next time)
200 grams of white chocolate chopped into chunks
125grams of raw macadamia

Follow the recipe for above.

Sometimes I use most of the ingredients cold - because I have a kitchenaid it can cream the butter quite well and I tend to be impatient - I also keep my flour in the freezer so it tends to make the mixture cold anyway.

If you use all room temperature ingredients then again I have read that you should refrigerate the dough for half an hour before using it. I refrigerated half the white chocolate cookie dough - to test if t here was a difference and I thought those cookies were a little higher than the non-refrigerated dough ones.

Monday, May 04, 2009

Piece of cake - Labor Day

Posted by PicasaI might be jinxed, because my home computer has frozen and not allowed me to finish this post. I had to move to Paul's Mac and I am not at all used to using a Mac. This weekend so far I have made, Anzac biscuits with a drizzle of choc fudge, mini choc chip muffins, poached breast of chicken with salsa verde, green beans and preserved lemon wholemeal couscous and now this cake.

I was inspired by a Donna Hay lemon and yoghurt cake that my friend Carly told me she had made the other day. I decided to make an orange and ricotta almond torte. This is what I put in it:

125grams unsalted butter (room temperature)
1 cup raw organic sugar
2 eggs
1 cup ricotta
zest of one orange
juice of half an orange
1 and a half cups of almond meal
1/2 cup of self-raising flour
1 teaspoon baking powder

Turn on oven to 180 degrees. Butter, flour and line a 20 cm cake tin. Beat butter and sugar till creamy add one egg at a time beating well after each egg and then add the zest. Next add th ricotta, almond meal, flour and baking powder and stir through, then mix in the orange juice.

Now for baking I will have to take you through the trials and tribulations. The DH version of lemon and yoghurt cake calls for 45 min at 180 c.

Because this cake will be dense due to the almond meal I decided to try to bake for 50 mins, then I checked with a wooden skewer to make sure it is cooked through before removing. However, I found mine really browned on top quickly so I turned it down from 180 to about 160 - I have a hot oven though.

When I took it out and cooled it for 10 mins I removed it from the pan and found the bottom of the cake in the middle a little wet so I put on a flat tray and returned to the oven for another 20 mins on 160 degrees celcius. I think because this is such a dense mixture you do have to cook it for longer on a lower temperature. It was lovely and moist when Elliot had the first slice.
Ideally I think it would be nice with a lovely dollop of greek yoghurt on the side and maybe a strawberry.


Saturday, May 02, 2009

Oh happy day, I finally have a personal computer with Picasa on it and my photographs loaded onto it so I can load a photograph without to much hassle. Its only been years.....

This beautiful cake comes from this fabulous book.

It is the Apple and maple cake and for good measure I added some caramelised walnuts for some sweet crunchy texture. Quite a rustic cake and not too sweet. I won't repeat the recipe because if you don't have this cook book then I hope this cake is the reason you think about buying it. I got mine from UK Amazon with the current exchange rate its very reasonable compared to the price you can pay in $A.

Posted by Picasa

Wednesday, January 28, 2009

Mini Spelt Chocolate Chip Cupcakes

I used to only bake chocolate goodies for Elliot for school but now with Gabi no longer at day care I can make some chocolate treats they both can have. (Gabi’s day care banned chocolate).

I happen to think that a bit of chocolate at school will trigger some good endorphins so I hope that having a little chocolate cupcake will be something that makes them feel happy for the rest of the day.

Last year I introduced more organic produce into our diet, and this year I am trying to incorporate more whole foods into our lifestyle. I use one of the best priced organic companies in Brisbane for my products at www.organicaddiction.com.au if I had not found this company I may not have made the switch so easily as their produce is competitively priced.

I have used whole grains and organic products in this recipe because of our life style changes. I like to bake treats rather than buy them because you know what’s in it and there are no preservatives and those rules should apply whether you use organic products or not.

If you are not able to use organic or spelt products, then use white flour instead.

I think you could replace the spelt with either self-raising flour or plain flour with 1 teaspoon of baking powder – they will be lighter than these ones made with spelt. This recipe is an adaptation of my cupcake recipe – but I made some changes in order to work with the density of the spelt flour.

Mini Spelt Chocolate chip cupcakes

125 grams butter

½ cup organic raw sugar (or caster sugar)

2 organic-free range eggs

¼ cup *Cacao powder

1 and ¼ cups spelt flour

2 tablespoons sour cream

Dash of milk

120grams chocolate chips

Pre- heat oven to 170 (my oven is hot so I cooked about 150 degrees and used the middle rack)

Cream butter and sugar till white and light in texture (approximately 5 minutes). Add one egg at a time beating thoroughly after each one.

Mix through cacao powder and spelt flour. Add sour cream. The texture will be quite thick a this stage, so you need to add the sour cream and then the dash of milk to thin it out a little. I was aiming for texture that was not runny so that if you take a spoonful of the mixture it will not run off the spoon but fall off slowly and require a little assistance.

Line a 12 cup mini muffin pan with mini cupcake papers.

Place teaspoons full into paper liner – filling right to top and a tiny bit extra of the mixture on top as this flour will not rise.

Leave in oven for up to 20 mins but check around 15 mins – use wooden skewer and if it comes out clean they are ready. I think mine took about 18 mins

Makes approximately 30 mini muffins.

My experiences with spelt flour: it is quite a dense flour so this time I decided not to add any baking powder. I previously made some normal sized cupcakes and used a bit more sugar (3/4 cup) and baking powder (1 teaspoon). When I made it with the extra additions it took me ages to be sure the cake was cooked in the middle and the top had risen cracked then formed a hard shell – so they didn’t look as attractive as these little mini ones.

I also decided to reduce the sugar to ½ cup to make them a bit healthier as the aim was to provide a treat for the children but not go too heavy on the sugar as the chocolate should be the highlight here.

* I chose to use cacao powder rather than cocoa as part of our lifestyle changes as cacao is said to have more anti-oxidants than regular cocoa. Again if you are unable to use cacao – then cocoa can be used instead.


Tuesday, January 27, 2009

My spiced mango chutney


Well Blogger is decidedly odd, I have tried several times over the past couple of weeks to upload a post of our Christmas lunch, but it just isn't happening. So I thought I would try ploading this photograph (even though I have already posted it to Lifestyle food's website) something new when blogger gets me down.

I don't think my Christmas lunch will be posted here so instead I am going to move on with this recipe:

Ingredients:
  • 2 large RE2E Mangoes (or 4 small mangoes) preferably not quite ripe
  • 4 tablespoons sunflower oil
  • 2 shallots finely chopped
  • 1 small white onion finely diced
  • 1 red chillie seeds removed finely diced
  • 3cm piece of ginger finely diced
  • 2 cloves of garlic smashed
  • 1 cup brown sugar
  • 400mls white or malt vinegar
  • 1/4 teaspoon ground coriander
  • 1/4 teaspoon ground cumin
  • 3 whole cardomum
  • 1/4 teaspoon whole mustard seeds
  • 1/4 teaspoon whole fennel seeds
  • 2 star anise
  • ground pepper
  • salt
Method
  • Cut mangoes into large dice.
  • Grind the cardomum, mustard seeds and fennel seeds in a pestle or mortar.
  • In a saucepan, saute shallots, onion, chillie, ginger and garlic in some sunflower oil for about 10 mins till onion is softened.
  • Add the mangoes, ground spices and star anise and stir in throughly. Next add sugar and mix till dissolved. Finally add the vinegar, pepper and salt to taste. Leave to simmer for up to 45mins. Stop cooking early if the pieces of mango start to lose its shape too much - you want the chutney to have some chunkiness to it and not became a jam.
  • I bought some glass jars from Coles/Woolies and washed them out thoroughly then filled them with some boiled water to sterilise them . Remove water and let dry naturally.
  • I made quite a bit of chutney, so much so I was able to give one bottle away as part of a birthday gift and another to a friend who was envious of my birthday friend receiving a bottle. Both friends said they loved the chutney. In fact so did I - I will never buy mango chutney from a shop again!
Notes And Tips

One word of warning, one of my jars cracked when adding the boiling water, I think that I should have washed them in very warm water first to heat up the glass and reduce the chance of it cracking when under heat. Ways to serve as a side dish for Indian curry, on a turkey sandwich, on a lentil burger, with some grilled fish or chicken.

Monday, December 08, 2008

Zucchini and pistachio spice cake - late virtual hug


I missed the weekend of virtual hugs for Barbara, but that doesn't mean I still didn't want to send one to Barbara from me and my girl with this cake made with lots of good fresh ingredients and made from the loads of organic zucchini I have been buying lately from my friends who have me buying lots more organic produce these days.

It started with my wanting to reduce the amount of pesticides in my families life. I am happy to say from an organic perspective we now mostly eat organic, pasta, rice, milk, eggs, fruit, vegetables, chicken, beef, pork and I also bake with organic flour, sugar etc.

This beautiful cake is topped with a lovely fresh lime cream cheese frosting. The cake itself tastes of cardamom and mixed spice and lovely bites of pistachios. The recipe is one from the Delicious magazine and can be found at one of my favourite websites at Taste.

I think this cake makes a great virtual hug to Barbara because it is filled with lots and lots of organic goodies prepared with love and care to share with all those I love.

Baking to me means caring and sharing. For my children I hope I am creating memories of a loving mother who wanted to make her children happy and healthy. Because I work full time I hope my children will remember less about the mother who wasn't there in the afternoon, and more about the mother who remembered them everyday and showed it each day when they opened their lunches and found a special treat I made for them, and one extra to share with their closest friends.

I am not the mother who drops them off regularly, goes on the excursions, reads to the class, or participates in tuck shop, but I am the mother who wanted to provide them with beautiful things to taste and remember as a highlight of their day, its my love letter to them.


My beautiful son on his tenth birthday last month. A cheesecake lover I made him one of his absolute favourites and all time classic - a new york cheesecake courtesty of Taste once again.

Sunday, November 09, 2008

Lumberjack Cake


A friend on facebook recently pointed me in the direction of this lovely and rustic looking cake.
I did some googling and found a number of recipes with variations on the amount of sugar, green apples and dates and eggs.
The first recipe I found on a favourite blog. I made it for Melbourne Cup day and it was quite a hit satisfying all our cravings for a sweet hit in the afternoon. The first one I made I served with the caramel sauce and cream.
Today I went for simplicity and varied the quantities on the sugar, eggs and apples. So my version of the cake is so:
For the cake
200grams of dates chopped
1 cup of hot water
1 1/2 tsp baking soda
125grams of butter softened
1 cup castor sugar
1/2 tsp of vanilla paste
1 egg
2 green apples, peeled and diced
1 1/2 cups plain flour
For the topping
3/4 cup shredded coconut
1/3 cup milk
1/2 cup brown sugar
3 tablespoons of butter
Turn on the oven to 180 degrees (160 fan forced).
Place chopped dates, hot water and bicarb of soda in a non-metallic bowl and leave till cool.
Butter and flour a square pan or a round one and line with baking paper. Mine was a large round one about 26 cm in diameter.
In another bowl, cream sugar and butter till pale and fluffy, add lightly beaten egg and vanilla and mix through. Then add flour, date mixture and apples alternately till combined.Transfer to baking pan.
Cook for 45mins or until skewer inserted in middle comes out dry.
While cake is cooking, combine topping ingredients in a small saucepan till butter melts.
Remove cake from oven and spread over the topping. Return to the oven for 15 mins until topping is brown.
Cut when cool and serve with cream.
P.S the beautiful yellow day lilly is from our front garden. Its taken nearly a year but they have finally flowered and are gorgeous. Gabi cut off two to give to Di our lovely neighbour as a thank-you for the beautiful hibiscus that she scored from her last weekend.

Sunday, November 02, 2008

Paul's duck salad


A very, very, very late evening for us last night cooking a Thai feast. We started with pork rice rolls, and chicken spring rolls and Thai Mojitos, then we had this duck salad, the Thai red lamb shank curry from the previous post, a cucumber salad and then a trio of desserts - coconut creme caramel, mango and lemongrass tart and vanilla bean icecream. A marathon of cooking, eating and entertaining hence why I will leave it till later this week to post the recipe for the duck salad a Paul special. Our guests left at 2am and I got up at 5am that morning to track down the many ingredients. It was a breeze to actually serve as we did all the preparation in advance.

I couldn't resist posting the picture of the beautiful hibiscus as well. Paul and Gabi went next door for a swim and while there the lovely Di (our neighbour) went to cut two of her hibiscus for her own purposes. Gabi has a sharp eye and immediately asked for one, while I am happy to have one, I feel sorry for Di having to give it up to Gabi. However Gabi does have a good eye and appreciates natures beauty so its not being wasted with us and indeed being imortalised on the internet!.


Thursday, October 30, 2008

Gabi's 5th birthday - Pirates and Fairies party


Birthday cake from Vanilla pod

Smartie cookie new recipe


Lemon iced biscuits


Fairy cupcakes
We had a big weekend preparing for the invasion of fairies and pirates - I think I was remarkably restrained in my food preparations. The Menu: Mini Quiche (I bought the baked pastry cases from Coles) my MIL brought the sandwiches, Cupcakes, the biscuits above, a fruit platter, bannana bread, lemon and poppy seed cake (damn forgot to get a photograph of) and that was it.
I used a new recipe for the cupcakes some of them were coconut ones, but I wasn't happy with it so I won't post it as I won't use it again.
The iced biscuits though were great and a nice change from ginger bread men.
Ingredients 250 g chilled unsalted butter, chopped
2 cups plain flour
3/4 cup caster sugar
1 egg
Pure icing sugar
lemon juice
Preheat oven to 180degrees c
In food processer mix the butter and flour until it looks like breadcrumbs. Add sugar and mix to combine. Add egg and continue to process until mix comes together. Knead on floured surface for a few minutes until smooth. Divide in half and wrap in cling wrap and chill for 30 minutes.
Line baking trays with baking paper. Roll out dough on a floured surface to half a centimetre thickness and use cookie cutters of your choice.
Bake for 8-10 minutes until light golden - I went for paler biscuits.
Gabi didn't like the lemon flavour so some were not iced and then later I decided to only use the pure icing sugar and milk. You need the icing to go hard quickly on these cookies so pure icing sugar not icing mixture is what you should aim to use. If you make the lemon icing use 1/2 cup icing sugar sifted to 2 tablespoons lemon juice.
The Smartie cookies are based on the chocolate chip cookie recipe using smarties instead of chocolate chips.


Saturday, October 25, 2008

Lamb shank red curry


I can't tell you how this was made, I wasn't at home when it was made by Paul and our good friend Kim who is a fabulous cook. It was the most delicious curry I have eaten in my entire life - yes it was that good. I will ask Paul to tell me how they made it and post it - I would hate to think that I will never have that fabulous flavour in my mouth again. I can tell you how she made the rice it was very simple and fool proof.
One cup of rice to one and a half cups of water - rinse the rice first if you like and drain then add the required water - so two cups would mean three cups etc. Also add a touch of salt.
Bring to the boil without a lid - then as soon as it boils reduce down to the lowest temperature you can get - seal the lid with two paper hand towels between the lid and the pan - this will help absorption of the water. Leave on low for 20minutes, then turn off . Don't remove the lid during this time and leave standing for another ten minutes off the heat before removing the lid. When you take the lid off its ready to serve.

Random scallop dish


This dish is the result of an evening dining with my sister-in-law. She had some scallops left over from the dinner she cooked for us and was unimpressed so gave the remainder to Paul and me.
I promptly cooked them for lunch. As I recall it was a leek and wood smoked bacon sauce with a dash of cream and some organic olive oil drizzled over for good measure. The scallops were very simply grilled on my flat grill.
It was pretty darn good.
Oh in the back ground is some beautiful garlic turkish bread I get from the Rocklea markets - first I lightly grilled it and then we used it to mop up the sauce on the plate. A hint of dill is the last embellishment

Thursday, January 25, 2007

Nigella's New Year's day hangover pasta.


So called because on New Year's day I decided this was the pasta to fill that seemingly empty feeling I have in my stomach after an evening of indulging in lots of wine and food.

I found this recipe in an old Delicious magazine and was intrigued by the use of fresh tomatoes rather than ones which had been cooked and cooked. I did embellish however, with some leftovers from the night before, note the caviar and sour cream.

Nigella's title for this pasta is: Spaghetti al sugo crudo (spaghetti with raw tomato sauce)

I kg of ripe tomatoes
1 tsp caster sugar
1 garlic clove
1/2 cup (125ml) extra virgin olive oil
400 grams spaghetti

Blanch the tomatoes in hot water for a few mintues i.e. cut a small cross in the base of the tomato, put them in a bowl pour over some boiling water leave sit.

Drain, then peel away the skin starting at the cross. Halve the toms, and deseed. Cut out the cores, then chop the remaining flesh finely. Put them in a bowl add the sugar with some sea salt and freshly ground black pepper. Bruise the garlic with the flat edge of a knife. Peet then add the smashed clove and the oil to the toms. Beat with a little whisk to make everything come together as a sauce. Cover with cling wrap and leave at room temperature for 30 minutes to 8 hours. (30 mins if your desparately hungover!)

Cook the pasta in a large saucepan of boiling salted water - drain. Remove the garlic clove and discard OR NOT - toss the tomato mixture into the hot spaghetti. Work the sauce through the pasta, so that is evenly coated, and serve immediately.
Posted by Picasa

Scallops and Pork Belly


Okay, so I know its no longer fashionable, but a follower of fashion I have yet to become! I just like this combination and I really don't get to dine out that often so P and I are not over it and have made our own version of this dish.

We have made the dish twice this year already, once for our NYE marathon dinner and another dinner where I invited over a couple of friends from work with their partners. I am pretty happy with the result both times. For an entree for four we used just under a kilo and scored it into about 12 square pieces (3 each as above) probably 15 all up (and had those other pieces as extras if needed).

While at restaurants I have tried versions of this dish in which I would describe the pork as being slow cooked, however P and I decided we like our pork belly rind nice and crispy, so we scored the the rind into squares. Then we marinated the piece of pork belly overnight. We made sure the marinade only wet the meat and kept the top dry. The marinade was made of simple asian flavours of oyster sauce, soy sauce & sesame oil.

We removed the pork belly from the marinade then dried the top with some kitchen towels and rubbed in some sea salt. After that we roasted the piece for a couple of hours. First at 160 degrees celcius for about an hour and a half and then whacked the oven up to 200 degrees and gave it a burst of heat for half an hour. In the event the top is not nice and crackly, you can always turn the grill on instead for 10 minutes or so.

We used about 4 scallops per person and grilled them in a pan, we have also done them on our electric bbq which is another good option for getting them nice and brown. They didn't take long to cook a scant couple of minutes.

With the remainder of the marinade we put that in a saucepan and reduced it to a nice sticky sauce that we could drizzle over the final dish when serving.

Mmmmm... planning to make this dish again soon.
Posted by Picasa

Friday, January 12, 2007

Christmas Day entree: Mudcrab, prawn & rocket salad.


Posted by Picasa
You wouldn't think it, but here at the LL household I have been cooking up a storm, homemade ice-creams, cakes, duck salads, handmade duck ravioli, a wagyu rump roast, double lamb cutlets, scallop and pork belly, the list goes on.
But of course all this frenetic activity meant guests in the evening and that doesn't bode well for taking good photographs I am afraid I just don't have the equipment for the necessary lighting!
But I will do the best I can as some photographs have been taken although not all are worth publishing I am afraid.
This one taken on Christmas day captures the essence of an Australian Christmas entree suitable for a warmish day on the Sunshine coast. My mother and I purchased some huge mud crabs, oysters and prawns to have prior to the roast pork, goose fat potatoes and simple salads.
In the gourmet desert that my mother calls her home, I concocted a dressing of olive oil, fish sauce, soy sauce and fresh lime & red chillies and as I said several times that day, pity she didn't have any fresh ginger I could have finely grated into the dressing (well that would have worked if only I had remembered to take my great micro plane!) Oh well twas' still a fine little starter.

Thursday, December 14, 2006

Food glorious food 2006


While I notice that some food bloggers have prepared calenders this year, I decided that my amateur work is not worthy of such focus and decided instead that I would make a collage of some of the food I prepared in 2006.
I recognise that the year is not over yet and christmas banquets have yet to be done, but I usually do one separate Christmas Collage in any case so that will come later.
*PS click on the photograph to enlarge for details!

Smarty Pants Cookies


These are the cookies I made Elliot to take to school as part of the end of year celebration feast he is enjoying today. I was supposed to make cake, but I started worrying about refrigeration and although they were using eskies etc. I thought it would be less trouble to make this lovely Smarty Pants cookies although as you can probably tell I actually used M&Ms I asked P to buy smarties and this is what I get - what is that saying "Never send a man....! .

I became a bit anal with the colour of the M&Ms I put on the cookies although the results of that are not reflected here exactly, what is reflected is that in the end due to my being anal i.e. ensuring I put a different coloured M&M on each biscuit in the exact same order, I was left with way too many blue ones. So these are the cookies that didn't make it to the feast and decided to keep at home, cos you know how much 8 years will care that I put a different coloured M&M on each biscuit in the exact same order.

Anway the recipe incorporated almonds which I substituted coconut for, the reason being that there are too many kids out there with nut allergies so it is better to avoid that problem with group feasts at school. I found them a little sweet for my taste as well I think next time I will cut down on the sugar. Other tips include making sure you don't do too many at once or they will spread and join up and then you will have to cut them apart, also make sure you use a small ball of dough so that proportionately the cookies and the amount of smarties don't look odd and finally a lighter coloured cookie is better looking than a golden one - so 10 mins and a bit lower temp than the recommended 180 c.

This is a very much Elliot cooking story today, because the background picture to this photograph involves some of the art work that he took home yesterday. I am loving the progress they are making with their artistic work at school. I may use some other interesting pieces for some recipes - I thought this piece went perfectly with these predominantly blue coloured M&M cookies.

Smartie PantsIngredients:
125g butter,
½ cup caster sugar,
½ cup brown sugar lightly packed,
½ tsp vanilla extract,
1 egg lightly beaten,
1 ¾ cup self-raising flour sifted,
½ tsp salt,
¼ cup slivered almonds,

180g Smarties©

Steps: Preheat oven to moderate, 180 degrees Celsius. Cream together the butter, sugars and vanilla using electric beaters until combined. Add lightly beaten egg, and beat until smooth. Mix in sifted flours and salt with a wooden spoon. Add slivered almonds and mix until combined. Shape tablespoonfuls of mixture into balls, and place onto a baking tray lined with baking paper. Flatten gently, then press smarties into the surface. Leave about an inch between cookies as they do expand upon baking. Bake for 10-12 minutes or until lightly golden

Sunday, December 10, 2006

Christmas Fare 2006


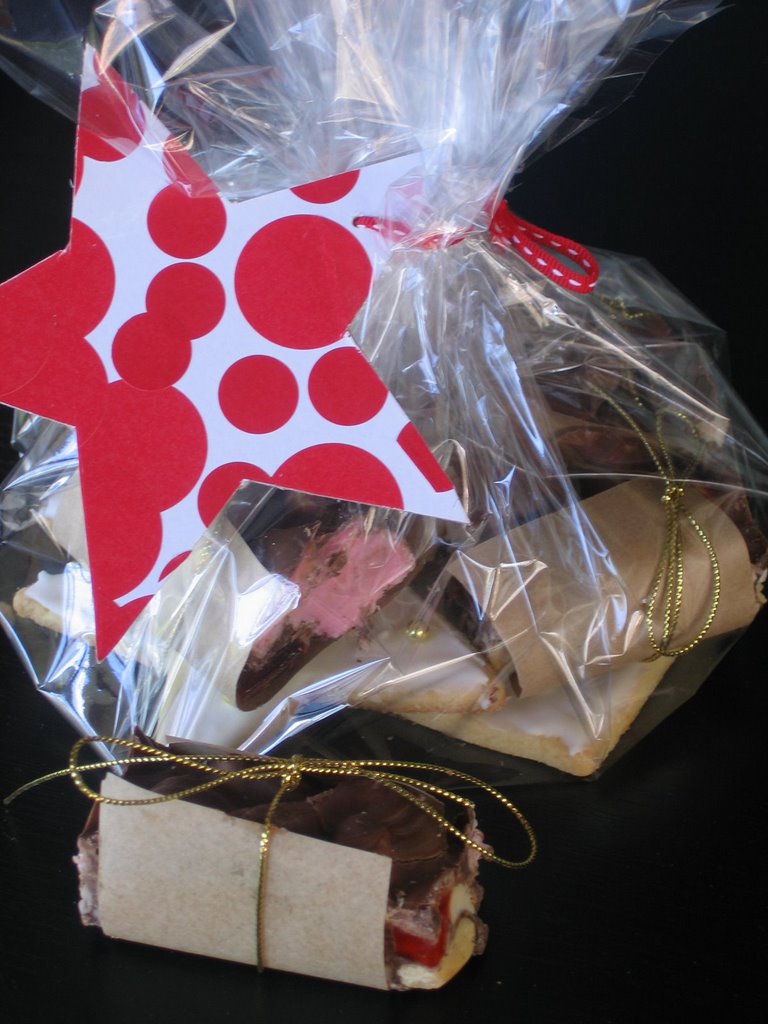
Here is a sample of my 2006 Christmas food gifts. Posted by Picasa

I am making iced lemon cookies and rocky road. I will also make gingerbread later this week. Elliot is taking the lemon cookies (which I have wrapped in cellophane) to school for his classmates I thought they could double as decorations if they make them to the tree.

Gabriella helped make the star cards - I went to Office Works and bought large and small red circle stickers and some stiff paper. Gabriella stuck the stickers on and Elliot traced the star shape on the back, I cut it out. We are becoming a real family Christmas affair these days.


Recipe for Lemon Cookies:

100 grams of unsalted butter
100 grams of castor sugar
225gram plain flour
zest of one lemon
1 egg

Preheat oven to 180c.

Beat the butter and sugar till nice and creamy and then add the egg and beat for another few minutes.

Stir in the lemon zest and incorporate flour till it forms a dough. Use extra flour to knead the dough together so it not so soft. Take 1/4 of the dough and roll out on some silicone baker paper, then begin cutting shapes - trees and stars for Elliot's class, and hearts for our friends.

Bake for approximately 10 to 15 mins, it is supposed to be golden but I found mine were darkening around the edges before they ever became golden so I preferred them pale.

I decorated the heart ones with silver and gold cashous. If you want to turn them into decorations, before you bake them make a hole in the cut out dough with a wooden skewer.

I then iced them with the same icing I use for gingerbread men. If you have left over icing - transfer to a dish then cover it will some plastic pressing down on the surface so it doesn't dry out.


My traditional gingerbread recipe

350 grams plain flour
1 teaspoon bicarbonate soda (or baking powder)
2 teaspoons ground ginger
100 grams unsalted butter
175 grams brown sugar
1 egg
3 tablespoons golden syrup

Preheat oven to 170 degrees.

Line baking trays with silicone baking paper. Sift flour, bicarb and ginger into a large bowl.

Rub in butter until mixture resembles breadcrumbs then rub in the sugar. Beat egg and syrup together and stir into flour mixture, mixing lightly to form a smooth dough. Rest in the refridgerator for 30 minutes.

On a floured surface rollout dough to 4-5mm thickness.
Cut into shapes and transfer to baking tins.
Bake for 12-15 mins or until golden brown.
Remove from the oven and leave to cool slightly on trays.

Transfer to wire racks to cool completely then ice.

Icing
200 grams of icing sugar
1 egg white
1 tablespoon lemon juice.

Beat the egg white until soft peaks form and gradually beat in the icing sugar followed by the lemon juice. Ice the biscuits and decorate with silver/coloured cashous for buttons.

Hints: It is easier to roll out the dough on the silicone baking paper that you line the tins with. So remove the paper from the baking tins, roll out the dough, cut out the desired shapes, take away excess dough and then put the baking paper back into the baking trays.

That way you don't accidentally break any of the arms etc. As you can see I decided to use the snowman shape and the stars. The snowman makes a large biscuit enough really for two people to share. I think I averaged about 30 stars and 8-10 snowman per batch.

With the stars, I found because they are so small they baked really quickly maybe five minutes, though I really just kept a close eye on them. The larger biscuits took about 10 minutes really.
Baked cookies


When in a hurry I haven't rested the dough and not had any problems - sometimes it is best to start with everything very cold i.e. flour in the freezer etc and that helps keeping the dough malleable.
Iced cookies:


Packaged cookies 2004


Christmas Fare 2005


Packaging Christmas 2005


I also baked some lemon cookies last night because Elliot thought his class wouldn't like the ginger - this is not a strong ginger flavour he is just being picky and being the overcompensating working mother I am I made him different biscuits which I must say I am very happy with anyway.

I am also making some Rocky Road today so tune in for some piccies of all the christmas fare which I will update some time today.

Saturday, December 09, 2006

T&T's Wedding Cake

Posted by Picasa

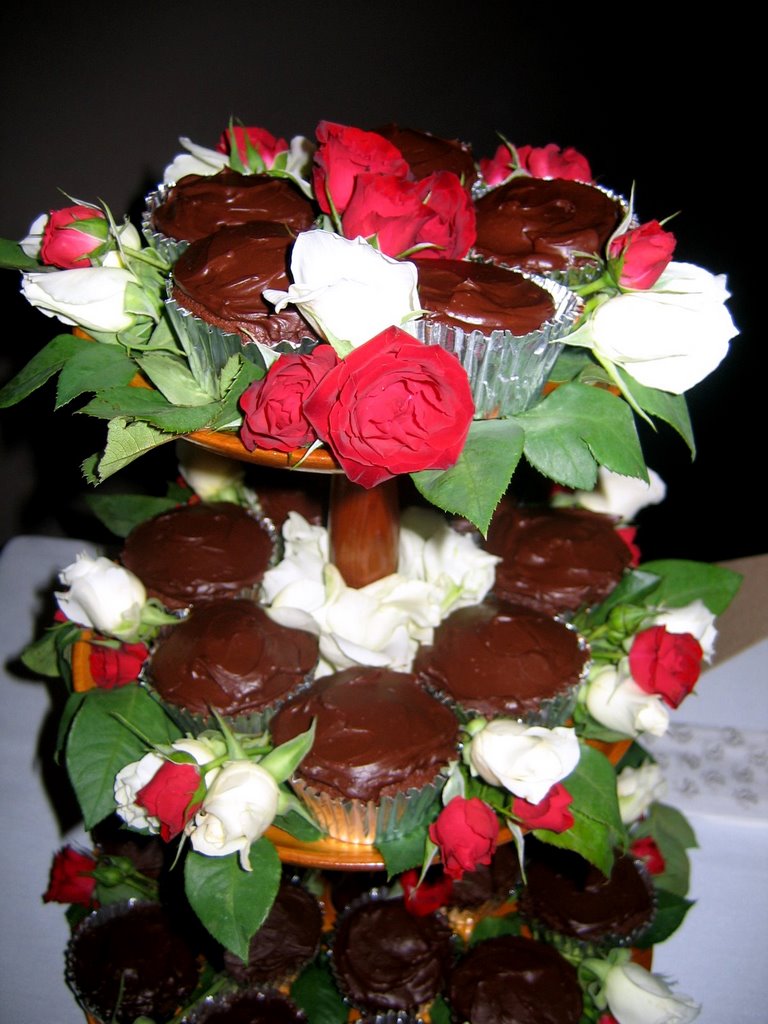
This is the cupcake wedding cake I put together for my good friend's wedding. I baked 130 chocolate sour cream cupcakes with a chocolate sourcream ganache last Friday night. At 5.30am Saturday morning I was up tracking down the roses.

I found the recipe for Old-Fashioned Chocolate Cake in Nigella Lawson's Feast and the ganache recipe from Rose Berembaum's Cake Bible. I chose the ganache as I knew it would withstand being baked, transported and kept at room temperature quite well before making it to the airconditioned room.

T chose the stand which typically of T she used because it has sentimental value as it was made by her mother's father - it was a very simple three-tiered wooden stand and beside the cake stand she had her parents and her husband's parents wedding photographs a lovely touch and works terribly well when your parents are not divorced or remarried!

I am told everyone enjoyed the cakes, not surprisingly I couldn't stomach a single cupcake having baked and iced them all. It was quite nerve wracking not being a professional baker, but I think that lots of lovely fresh flowers can be very forgiving.

One other good thing that came from this commission was that I finally bit the bullet and have dispensed with my 10 year old Sunbeam handbeater for my gorgeous red hot KitchenAid, all the better to bake lots of batches of christmas cookies!


One more shot of the whole cake stand:


While the groom preferred chocolate mudcake, my research lead me to prefer a recipe which did not involve melting approximatley 4 kgs of chocolate or baking the cupcakes twice the time it would take for this recipe. I guess I got a bit practical and chose a recipe that could be mixed in one big hit and take 15mins per batch of 24 as this meant I could have at least 5 hours sleep instead of no sleep if I went with the mudcake recipe.

Old Fashioned Chocolate Cake

200 g plain flour
200g castor sugar
1 teaspoon baking powder
1/2 teaspoon bicarbonate soda
40g best quality cocoa

175 grams unsalted butter
2 large eggs
2 teaspoons real vanilla extract
150ml sour cream


Have all ingredients at room temperature and preheat oven to 180 c.

Put all the cake ingredients into a food processor (or the KitchenAid) and mix until you have a smooth, thick batter.

Place spoonfuls in cupcake liners and bake for approx 15mins. I used a double batch and it made about 40 cupcakes!


Sour Cream Ganache.

Its very important that the sour cream is room temperature or the ganache will lump and become dull - it happened to me once!

340 grams of bittersweet chocolate
400grams of sour cream

Melt the chocolate in the microwave (on a lower power) check every minute or so. If dish feels warm transfer to another bowl. Add the sour cream and stir with a rubber spatula until uniform in colour.

If the ganache is refrigerated - soften by placing the bowl in a water bath or a microwave for few seconds stirring gently.

About Me

My photo
Mother of two with one of each. Wife of one.Dogless. Busy working five days a week, baking and cooking when time allows. Writing rarely these days. Wishing I had time to read more often.