Thursday, December 14, 2006

Food glorious food 2006


While I notice that some food bloggers have prepared calenders this year, I decided that my amateur work is not worthy of such focus and decided instead that I would make a collage of some of the food I prepared in 2006.
I recognise that the year is not over yet and christmas banquets have yet to be done, but I usually do one separate Christmas Collage in any case so that will come later.
*PS click on the photograph to enlarge for details!

Smarty Pants Cookies


These are the cookies I made Elliot to take to school as part of the end of year celebration feast he is enjoying today. I was supposed to make cake, but I started worrying about refrigeration and although they were using eskies etc. I thought it would be less trouble to make this lovely Smarty Pants cookies although as you can probably tell I actually used M&Ms I asked P to buy smarties and this is what I get - what is that saying "Never send a man....! .

I became a bit anal with the colour of the M&Ms I put on the cookies although the results of that are not reflected here exactly, what is reflected is that in the end due to my being anal i.e. ensuring I put a different coloured M&M on each biscuit in the exact same order, I was left with way too many blue ones. So these are the cookies that didn't make it to the feast and decided to keep at home, cos you know how much 8 years will care that I put a different coloured M&M on each biscuit in the exact same order.

Anway the recipe incorporated almonds which I substituted coconut for, the reason being that there are too many kids out there with nut allergies so it is better to avoid that problem with group feasts at school. I found them a little sweet for my taste as well I think next time I will cut down on the sugar. Other tips include making sure you don't do too many at once or they will spread and join up and then you will have to cut them apart, also make sure you use a small ball of dough so that proportionately the cookies and the amount of smarties don't look odd and finally a lighter coloured cookie is better looking than a golden one - so 10 mins and a bit lower temp than the recommended 180 c.

This is a very much Elliot cooking story today, because the background picture to this photograph involves some of the art work that he took home yesterday. I am loving the progress they are making with their artistic work at school. I may use some other interesting pieces for some recipes - I thought this piece went perfectly with these predominantly blue coloured M&M cookies.

Smartie PantsIngredients:
125g butter,
½ cup caster sugar,
½ cup brown sugar lightly packed,
½ tsp vanilla extract,
1 egg lightly beaten,
1 ¾ cup self-raising flour sifted,
½ tsp salt,
¼ cup slivered almonds,

180g Smarties©

Steps: Preheat oven to moderate, 180 degrees Celsius. Cream together the butter, sugars and vanilla using electric beaters until combined. Add lightly beaten egg, and beat until smooth. Mix in sifted flours and salt with a wooden spoon. Add slivered almonds and mix until combined. Shape tablespoonfuls of mixture into balls, and place onto a baking tray lined with baking paper. Flatten gently, then press smarties into the surface. Leave about an inch between cookies as they do expand upon baking. Bake for 10-12 minutes or until lightly golden

Sunday, December 10, 2006

Christmas Fare 2006


Here is a sample of my 2006 Christmas food gifts. Posted by Picasa

I am making iced lemon cookies and rocky road. I will also make gingerbread later this week. Elliot is taking the lemon cookies (which I have wrapped in cellophane) to school for his classmates I thought they could double as decorations if they make them to the tree.

Gabriella helped make the star cards - I went to Office Works and bought large and small red circle stickers and some stiff paper. Gabriella stuck the stickers on and Elliot traced the star shape on the back, I cut it out. We are becoming a real family Christmas affair these days.


Recipe for Lemon Cookies:

100 grams of unsalted butter
100 grams of castor sugar
225gram plain flour
zest of one lemon
1 egg

Preheat oven to 180c.

Beat the butter and sugar till nice and creamy and then add the egg and beat for another few minutes.

Stir in the lemon zest and incorporate flour till it forms a dough. Use extra flour to knead the dough together so it not so soft. Take 1/4 of the dough and roll out on some silicone baker paper, then begin cutting shapes - trees and stars for Elliot's class, and hearts for our friends.

Bake for approximately 10 to 15 mins, it is supposed to be golden but I found mine were darkening around the edges before they ever became golden so I preferred them pale.

I decorated the heart ones with silver and gold cashous. If you want to turn them into decorations, before you bake them make a hole in the cut out dough with a wooden skewer.

I then iced them with the same icing I use for gingerbread men. If you have left over icing - transfer to a dish then cover it will some plastic pressing down on the surface so it doesn't dry out.


My traditional gingerbread recipe

350 grams plain flour
1 teaspoon bicarbonate soda (or baking powder)
2 teaspoons ground ginger
100 grams unsalted butter
175 grams brown sugar
1 egg
3 tablespoons golden syrup

Preheat oven to 170 degrees.

Line baking trays with silicone baking paper. Sift flour, bicarb and ginger into a large bowl.

Rub in butter until mixture resembles breadcrumbs then rub in the sugar. Beat egg and syrup together and stir into flour mixture, mixing lightly to form a smooth dough. Rest in the refridgerator for 30 minutes.

On a floured surface rollout dough to 4-5mm thickness.
Cut into shapes and transfer to baking tins.
Bake for 12-15 mins or until golden brown.
Remove from the oven and leave to cool slightly on trays.

Transfer to wire racks to cool completely then ice.

Icing
200 grams of icing sugar
1 egg white
1 tablespoon lemon juice.

Beat the egg white until soft peaks form and gradually beat in the icing sugar followed by the lemon juice. Ice the biscuits and decorate with silver/coloured cashous for buttons.

Hints: It is easier to roll out the dough on the silicone baking paper that you line the tins with. So remove the paper from the baking tins, roll out the dough, cut out the desired shapes, take away excess dough and then put the baking paper back into the baking trays.

That way you don't accidentally break any of the arms etc. As you can see I decided to use the snowman shape and the stars. The snowman makes a large biscuit enough really for two people to share. I think I averaged about 30 stars and 8-10 snowman per batch.

With the stars, I found because they are so small they baked really quickly maybe five minutes, though I really just kept a close eye on them. The larger biscuits took about 10 minutes really.
Baked cookies


When in a hurry I haven't rested the dough and not had any problems - sometimes it is best to start with everything very cold i.e. flour in the freezer etc and that helps keeping the dough malleable.
Iced cookies:


Packaged cookies 2004


Christmas Fare 2005


Packaging Christmas 2005


I also baked some lemon cookies last night because Elliot thought his class wouldn't like the ginger - this is not a strong ginger flavour he is just being picky and being the overcompensating working mother I am I made him different biscuits which I must say I am very happy with anyway.

I am also making some Rocky Road today so tune in for some piccies of all the christmas fare which I will update some time today.

Saturday, December 09, 2006

T&T's Wedding Cake

Posted by Picasa

This is the cupcake wedding cake I put together for my good friend's wedding. I baked 130 chocolate sour cream cupcakes with a chocolate sourcream ganache last Friday night. At 5.30am Saturday morning I was up tracking down the roses.

I found the recipe for Old-Fashioned Chocolate Cake in Nigella Lawson's Feast and the ganache recipe from Rose Berembaum's Cake Bible. I chose the ganache as I knew it would withstand being baked, transported and kept at room temperature quite well before making it to the airconditioned room.

T chose the stand which typically of T she used because it has sentimental value as it was made by her mother's father - it was a very simple three-tiered wooden stand and beside the cake stand she had her parents and her husband's parents wedding photographs a lovely touch and works terribly well when your parents are not divorced or remarried!

I am told everyone enjoyed the cakes, not surprisingly I couldn't stomach a single cupcake having baked and iced them all. It was quite nerve wracking not being a professional baker, but I think that lots of lovely fresh flowers can be very forgiving.

One other good thing that came from this commission was that I finally bit the bullet and have dispensed with my 10 year old Sunbeam handbeater for my gorgeous red hot KitchenAid, all the better to bake lots of batches of christmas cookies!


One more shot of the whole cake stand:


While the groom preferred chocolate mudcake, my research lead me to prefer a recipe which did not involve melting approximatley 4 kgs of chocolate or baking the cupcakes twice the time it would take for this recipe. I guess I got a bit practical and chose a recipe that could be mixed in one big hit and take 15mins per batch of 24 as this meant I could have at least 5 hours sleep instead of no sleep if I went with the mudcake recipe.

Old Fashioned Chocolate Cake

200 g plain flour
200g castor sugar
1 teaspoon baking powder
1/2 teaspoon bicarbonate soda
40g best quality cocoa

175 grams unsalted butter
2 large eggs
2 teaspoons real vanilla extract
150ml sour cream


Have all ingredients at room temperature and preheat oven to 180 c.

Put all the cake ingredients into a food processor (or the KitchenAid) and mix until you have a smooth, thick batter.

Place spoonfuls in cupcake liners and bake for approx 15mins. I used a double batch and it made about 40 cupcakes!


Sour Cream Ganache.

Its very important that the sour cream is room temperature or the ganache will lump and become dull - it happened to me once!

340 grams of bittersweet chocolate
400grams of sour cream

Melt the chocolate in the microwave (on a lower power) check every minute or so. If dish feels warm transfer to another bowl. Add the sour cream and stir with a rubber spatula until uniform in colour.

If the ganache is refrigerated - soften by placing the bowl in a water bath or a microwave for few seconds stirring gently.

Saturday, October 21, 2006

Prawn and Corn Fritters


I know this is too late for the Hay Hay Its Donna Day and F is for Fritter competetion. That I thought of them last week, and then saw some prawns for about $10 a kilo it was a fait acompli .


I just had to make these fritters this weekend. My mother's prawn and corn fritters are the most morish ones I have ever eaten and were probably the first. The batter uses finely minced, onion, garlic and ginger these three ingredients being the basis of nearly all my mother's traditional cooking.


The batter itself - a gorgeous mixture of mouthwatering prawns and sweet corn niblets.


Lightly frying and puffing up.


Recipe: I have provided one earlier with a very plain photograph and like all of my mother's recipes I know the ingredients but make it up as I go along.


1 egg
1 onion
2 cloves of garlic
2cm piece of ginger

300ml milk

2 cups plain flour
3/4 teaspoon baking powder

1 x. 400gram can of corn niblets
650 grams of medium size prawns

In my food processor, I finely chopped the onion, ginger and garlic. I changed the blade to the soft blade and then added the egg, flour and baking powder and milk and pulsed a few times. I removed the batter from the processor bowl and put it into a larger one and mixed through the corn and prawns. I added some sea salt at this point.

Gently heat (medium flame) some canola oil in a fry pan and when hot, add large spoonfuls of batter. Flip after a few minutes and keep them in a warmed oven while you cook the rest.

These are lovely served with a salad and lots of lemon.

However, I remember my mother also liked to serve them with some fluffy white rice.

In their glory.

Sunday, October 15, 2006

Apple fritters and vanilla ice-cream scattered with pariya rose petals and a drizzle of maple syrup


When I knew Hay Hay its Donna Day was coming up and the theme was fritters I knew it was time for me to enter the fray - it is my first foodie internet event/competition. I tend to shy away from competition, too scared of losing too scared of winning is the way I think of them. When I analyse this, I am quite sure I learned this lesson a very hard way when I was 16 years old, from my blonde and buxom best friend who as it turned out wasn't just very competitive with me at English. When she saw that I was interested in a boy at school she did her best - i.e. battered her eyelashes at him and I ran a very poor second.

Anyway I digress from a lesson learned long ago and onto happier things. Originally I had thoughts of preparing a family fritter "Corn and prawn fritters." I did a post on them a long time ago as part of a banquet based on family recipes when I first began this blog. I also gave some thought to revisiting some pea and haloumi fritters I did about three months ago but failed to post as my photography of them was quite appalling.
Late this afternoon I realised I hadn't bought the prawns or the haloumi I needed for those two fritters so I had to quickly consider something else. Two of the concepts I decided to keep in mind when coming up with a new fritter for which I would have the ingredients readily at hand was "traditional" and "family".
For the "family" part, I chose the plate pictured to serve the dessert on. The plate was recently given to me by my mother and it was from her mother. I don't think it is a fancy, smanchy brand name piece it simply states at the back "Made in Japan" but the fact it was from a woman to whom I am closely related and have never met and yet this woman means so much to my mother I thought it was perfect to use today. There are 2 of these plates and are rarely used by me but when I do, it is always with some reverence.

The recipe for the fritters is my concoction of a few recipes that can be found scattered on the internet. When making up the recipe I wanted to use rings of sliced apple, and a thick, airy, batter. As a result I think they look almost like doughnuts, indeed that's what Elliot thought they were.
Recipe:
1 cup plain flour

1 teaspoon baking powder
2 tablespoons vanilla castor sugar
1 egg
1/4 cup milk
1/2 teaspoon nutmeg
canola oil for deep frying
3 Braeburn apples(for approximately 4 serves)
Cinnamon Icing sugar for dusting
Maple syrup
Vanilla icecream
The apple of choice for us lately is the Braeburn, which is crisp, slightly tart & yet sweet. The perfect size for Elliot's lunch box, if it were too big there would be too much wastage as he would be throwing it away as there isn't time to eat a big apple and play Mum!

Out of the couple of dozen or so we have eaten over the past month only 1 or 2 have been on the floury side so pretty good percentages all up as far as I am concerned. I chose a couple of these apples for the fritters and cut them into rings. I made them about 1 cm wide and cut the core out of the centre.

In a bowl, combine the flour, baking powder, sugar and nutmeg. Add the egg and milk and beat with a whisk until well combined. The mixture should be quite thick. Leave to stand for about 20 minutes.

In a deep saucepan, heat some canola oil over a medium heat. I checked my oil was hot enough by dropping a tiny bit of the batter in and see if the oil did its trick.

Dip the apple rings in the batter and add them to the heated oil. I did mine one by one as I used my smallest saucepan the bigger the saucepan the more you could do at once but probably no more than 3 is the best idea.

My oil was a bit too hot so I had to work very quickly ensuring the fritters were obtaining an even colour and then removing them to a plate topped with baking paper to drain. I knew the apple wouldn't be as cooked as I wanted but I also didn't want them to burn. So next time I think keep the oil on a lower heat or I thought I might microwave the apples for a couple of minutes before battering and frying.

I am so sick of editing this post but another good idea would have been to put these in a warmed oven at 100 degrees celcius for about 10 minutes so they would have cooked through and warmed the apple more.

To serve: I dusted the fritters with some icing sugar I had added some cinnamon to, and drizzled maple syrup over the ice-cream and fritters. Finally I scattered my lovely Pariya roses I got from the Essential Ingredient in Melbourne all over the plate. The roses provide the most gorgeous perfume to this dessert.


Update:

I made these fritters again with the left over batter last night and given that the first time I was trying to make, photograph and post within hours of the competition closing ,I was afforded a more leisurely approach and the finished product was much improved.

I used 2 braeburn apples and after I sliced them into rings I microwaved them for 2 minutes. So they were perfect on the inside. I moderated the heat of my oil better this time not too hot, produced fritters perfectly cooked through, (without resorting to the oven) so it meant I had a crispy outside as well.

It cannot be stated enough, just how well the combination of the Pariya roses and maple syrup enhance this dessert through the combination of flavour and fragrance!
For the full round-up of F is for Fritter for Hay Hay Its Donna Day head to Milk and Cookies after the 22 October for voting. The very talented jenjen will be announcing a winner soon after that.


Toasted Banana Bread


What a revelation I had this week at one of my favourite coffee shops. I ordered some banana bread with my coffee and I was asked whether I needed some butter. I have never had butter on it before but I thought instead of dismissing the concept out-of-hand I asked for the butter to be served on the side.

Once the bread was served to me I was surprised to find the bread had been toasted. I guess the reason I was so surprised is that I have always really considered that banana bread was a misnoma and it is really a a cake or better served as a muffin and when asked thought it better accompanied cream cheese frosting than butter. I mean there isn't any yeast in banana bread that I know of - is there?

I figure actually toasting banana bread is not a surprise to many , but for me the uninitiated into the joys of actually toasting the banana bread I have to say it was one of the most satisfying foodie revelations I have had to date.

So yesterday I decided to track down a very basic banana bread recipe, baked it last night, toasted it under my Breville flat sandwich maker, dusted it with some icing sugar and served it with some vanilla ice-cream, maple syrup and toasted walnuts.

For the purpose of this post this morning I decided to simply toast the bread and present it in much the same way as it was served to me earlier in the week. On that day, the toasted BB made a very satisfying 10.30am morning tea especially when I hadn't the time for breakfast earlier that day and portion control over the butter meant it was relatively healthy.

I think the recipe below is quite excellent - as it is low fat. I decided to use the simplest and most dense version I could find with no nuts or other embellishments. Indeed I noticed that many of the reviewers for the BB decided to take this super healthy version and add a naughty thing to it, like chocolate chips or healthier things like nuts!

From my experience this BB recipe could do with extra moisture and recommend adding more mashed banana or apple sauce.

Having read all of the reviews for the recipe I also think based on the majority of them that next time I would do the following:
* halve the amount of sugar or substitute white sugar with brown sugar
* use half wholemeal and half white flour
*add pecans or walnuts

Basic low fat Banana Bread from this site :
2 cups plain flour
3/4 teaspoon baking soda
1/2 teaspoon salt
1 cup sugar
1/4 cup butter, softened
2 large eggs
1 1/2 cups mashed ripe banana (about 3 bananas)
1/3 cup plain low-fat yogurt
1 teaspoon vanilla extract

1. Preheat oven to 170° c.
2. With some canola cooking spray I sprayed the inside of a loaf tin.
3. Sift the flours and salt together and set aside.
4. I really don't like the 1/2 cup measure for things so I cut a piece of butter that looked approximately like 1/2 cup and with a hand beater beat the butter and sugar and vanilla together until light and creamy (approx 3 minutes - longer for me due to not letting the butter soften).
5. I then beat in one egg at a time beating well after each egg.
6. Then beat in the yoghurt (I only had the kids full fat vanilla) and the mashed banana.
7. After that I gently mixed the flour through the creamy banana mix.
8. Pour into loaf tin and bake for approximately one hour.

Measures of success:
*Inserting a wooden skewer that comes out clean proving it is baked through.
*A big crack down the middle of the loaf due to the operation of the baking soda
*Light to medium browning with crispy outside crust which will soften the next day

Other thoughts:
*The other versions of the BB from the website sounded fantastic too, coconut would toast very well if added to the recipe.
*I saw that Chocolate and Zucchini had a recipe for BB with Cranberries, I haven't yet found a fresh cranberry but am willing to give the dried versions a go.
*It is worth paying $12.00 a kilo for 4 bananas to try the other versions - those cheaper bananas I posted about earlier are few and far between.
*One of the things I am finding it difficult to succeed in lately, taking a photograph of the finished product without one of my children's hands appearing in it no matter how many times I tell them to wait!


Thursday, October 05, 2006

Yes, we have some bananas - we have some bananas today!


Seriously - months of being a bananaless household and this week I have them coming out of our ears. While prices remain high in supermarkets and green grocers i.e. $14.00 per kilo, bargains can be found at the weekend markets and the roadside it seems.

My mother sent some home with the kiddies that she got at her local market for about $5.00 per kilo. This bunch of beauties was dropped off at my place this morning by a friend who stopped on her way to work and bought them from a road-side vendor for $4.50 for two kilos!

I am wondering whether to let some go nice and ripe to make some banana bread - I think its a must. P is dreaming of pancakes and bananas, maple syrup and pecans for dessert tonight with my mother's riper bananas.

Isn't it bizarre how we react to one of our staples becoming a rarity, I can almost empathise with those folks on Survivor- except of course their access to everything is extremely restricted.

Sunday, October 01, 2006

Risotto Bianco - with pesto

Two cuisines inspire me the most, Italian and Japanese. I have been leafing through the latest Delicious trying to work out how to track down Edamame and Wakame and at the same time, checking out Jamie Oliver's Italy and became mesmerised by his white risotto.

So due to the fact we are sans children this weekend (and week in fact), I decided to make this risotto but what also compelled me to cook it was the fact that I was making pesto anyway.

I have nearly always considered risotto part of my winter/autumn repertoire but with the addition of the pesto I started to consider the possibilities, a tiny course of white risotto and pesto before some grilled quail perhaps and then a pork dish. I am considering a menu consisting number of small dishes because of the dinner we had on Friday night.

A good friend of P's invited us over to meet his new partner and she also loves to cook so they were keen to try out a number of dishes on us. We started with some olives, cheese etc. The first course was a very small bowl of pumpkin soup. They asked us what we thought the secret ingredient was, I thought wasabi as I could taste mustard flavours in fact it was tomato. Who'd have thunk it!

They then served us some ravioli which they had made and filled with spinach and ricotta and made a lovely tomato sauce, parmesan and basil all really lovely light flavours.

Then there was some lemon sorbet. And finally a whole spatchcock and sweet potato salad. Finally there was a toblerone mousse - really we were very spoiled I think and I must say they are excellent cooks! I look forward to returning the favour which got me to thinking about this risotto as one of my courses.


My pesto is usually made in a mortar and pestle. A handful of toasted pinenuts, one clove of garlic a good handful of grated parmesan and three handfulls of basil leaves. Give it all a good bash and pour in some extra virgin olive oil and keep bashing it till you get it to the consistency you like your pestos (I am assuming that there are no pesto virgins out there!) but I don't like my pesto too coarse and dry as you can see.


Jamie's recipe called for onion, garlic and celery and white wine and warmed stock. I used half an onion, no celery (would have used it if I had it) , 2 cloves of garlic and about 1 litre of stock, a big splash of white wine and about 1 cup of aborio rice.

Heat the stock in a saucepan and keep it gently simmering.

Finely dice the onion and smash your garlic. Then in my saute saucepan I heated up a big splash of extra virgin and a knob of butter and when that was nice and bubbly I added the onion and garlic and sauteed on a moderate heat till transparent. Then add the rice and stir for a few minutes till the rice is coated with the butter/oil and looks nice and glossy next add the white wine.


When the wine has cooked out of the rice, add the first ladle of stock and a good pinch of salt. Keep the heat on simmer. Keep adding the stock ladle by ladle, but making sure in between each ladle you are constantly turning the rice and incorporating each ladle of stock prior to adding the next one.

I tend to find that this process takes up to 20 minutes. After 15 minutes, taste the rice, add more salt if necessary and if the rice is still not cooked keep adding the stock and turning the rice. The mixture will become creamier and creamier. The rice is cooked when it is mostly soft and only a subtle bite is left in the middle. Have a boiled kettle handy if the rice isn't cooked by the time you run out of stock and add some hot water.


Remove from heat and add a knob of butter and a good handful of grated Parmesan. Put on the lid and let sit for 2 minutes. Mine didn't look as oozy as Jamies. I can only think the way for me to get it like his is once it is cooked, add one last ladle full of stock/water and then mix it through gently and take it immediately off the heat so as not to incorporate or evaporate the stock into rice as I had been previously doing till this point.

Hmmm think I will give that method a whirl next time.

Serve it immediately, with a big dollop of pesto, some extra pinenuts and fresh basil scattered on top and a few dashes of extra v.


Yes I know overdid it on the number photographs but I am feeling very indecisive today!

Sunday, September 24, 2006

A birthday cake for P & R and R's wife


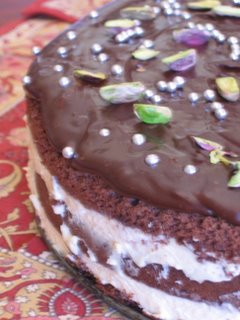
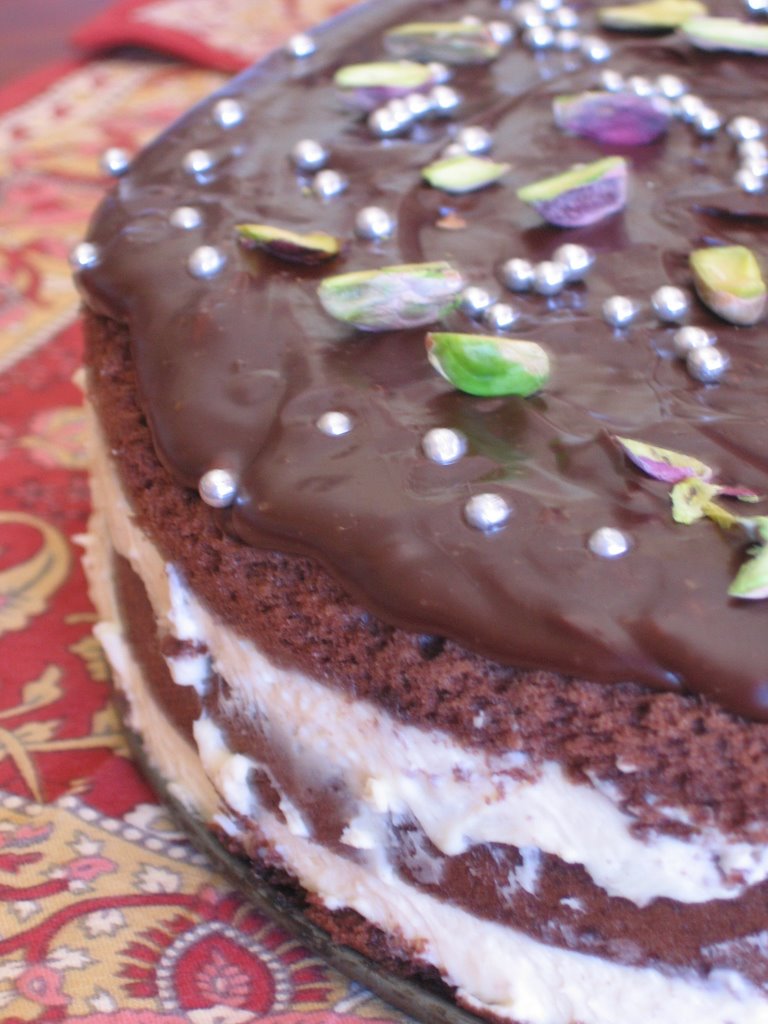
Nigella's Rococoa Cake

(Warning this cake needs over-night refrigeration prior to topping with chocolate glaze!)

I made this cake for P's birthday he shares with his brother R and while she doesn't share the same birthday, it was also for R's wife T.

In our family because there are so many birthdays we have to get together at a convenient time and share a few. P & R are twins so of course that means 2 with one blow and T's was around the same time. I made the cake for P to take to a lunch at his sister's place one Sunday and I couldn't go to it. Being the start of 3 weeks of hell at work at the time, I stayed home without interruption and wrote some submissions.

I have been wanting to make this cake for years when I first saw it in Feasts but a few things were stopping me, like sourcing the decorations and the three pages of instructions were quite intimidating. However for me, nothing could have been further from the truth in terms of actually making and assembling this cake it all came together beautifully, even though I didn't quite get the decorations right.

I actually needed gold cachous and did find them, but was dissuaded from buying them after I discovered a very small packet cost just under $10. I also needed to have nibbed pistachios. I ended buying shelled pistachios and tried my best to display their verdant insides to the world as best I could.

I now have the right colour cachous (my trip to Melbourne) but I still don't have the right pistachios oh well... means I have to make this cake again.

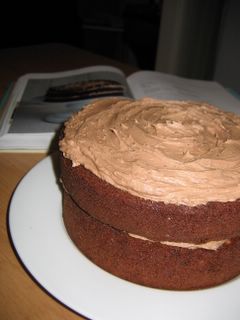
The cake itself was a very easily made chocolate sponge then it became a rum tiramisu topped with a luscious chocolate glaze. I have found that Nigella's chocolate cakes so far have all proved very easy to make and this one was similar to the Chocolate Malteser Cake in the same book.

For the cake:
50g plain flour
50g cornflour
40g cocoa
4 eggs separated
150g caster sugar
pinch of salt

Preheat the oven to 180 C. Butter and line the bottom of a 23 cm springform tin. Sift together the flour and cornflour, and add the cocoa, pushing it through the sieve. Whisk the separated egg yolks with half of the sugar - until the mixture becomes pale and moussy.

In a separate bowl, whisk the egg whites with a pinch of salt until firm, then whisk in the remaining sugar, one spoonful at a time, until you have gleaming white peaks. Gently fold in the yolk mixture into the whites, and then add the flour, cornflour and cocoa, folding gently again until combined. Pour this moussy liquid into the tin and bake for 30 mins. The cake will be almost silicon-springy on top. Unclip the tin and let the cake cool on a rack, right side up.

For the Rum-Espresso syrup
100 g castor sugar
60ml water
125ml strong coffee (or 125ml hot water and 2 teasp instant coffee powder)
60ml rum (I used less about half as much alcohol)

Bring the sugar and water to a boil in a small saucepan and let it bubble for just under a minute before taking the pan off the heat and adding the coffee and the rum. Stir- just with a fork - pour the hot syrup into a bowl and let it cool.

For the filling:
3 egg yolks
70g castor sugar
80ml dark rum
250g mascarpone cheese
250ml double cream

Put the yolks, sugar and rum into bowl that will fit over a saucepan of barely simmering water. Whisk (hand beater) until the mixture has thickened airily and the lift the bowl off the pan and let it sit on a cold surface while you whisk for another few minutes to help it cool down. Don't worry too much about whether it is thick enough, the marscapone and cream will give it the extra body to fill the cake later.

Make sure this mixture is quite cool before mixing through the marscapone. Softly whip the cream in a separate bowl and beat or fold that into the filling as well.

To assemble:

Cut the cake into 3 layers - thin slices. Brush a 23 cm springform tin with some of the syrup and then layer a third of the cake, laid horizontally, to line the bottom of the tin. Brush with syrup to dampen the cake and seal the joins.

Spread the layer of cake with half of the zabaglione using a rubber spatula and a light hand to coat evenly, and then add another layer of cake slices to cover. Dribble again or brush with the syrup until the cake is damp as before, and then spread over the final half of the filling.

Cover with the final third of the cake slices and drip, pour or brush over the syrup to give the cake a smoothish layer, which can be iced later; if the cake is damp, there's no need to drench it.

Put the cake covered with clingfilm, in the fridge overnight to set. You can ice the cake and return it to the fridge (although it will make the glaze dulish)

Icing
100g caster sugar
60ml or 4 tablespoons golden syrup
60ml dark rum
1 teaspoon instant coffee
150g best quality dark chocolate, chopped very small.

Put the sugar, syrup, rum and espresso powder into a small saucepan and bring to the boil. Turn off the heat and add the chopped chocolate, swirling it around so that the chocolate melts in the hot liquid. Leave for a few minutes and then whisk everything together in the pan (just using a little hand whisk) to make a smooth shiny glaze. Moving quickly, run a small spatula or thin knife blade around the inside of your cake tin. Spring open the tin, taking care with the sides as the cake will damp and delicate. Sit the cake on a plate or stand (don't move it from the tin's base - it will deconstruct!) and pour over the icing, letting it dribble here and there. You may need to ease it over the top of the cake while it is still malleable. The glaze will set quite quickly, as the cake will be quite cold and the finish will be ruined if you try and spread the icing too long after your initial pouring.

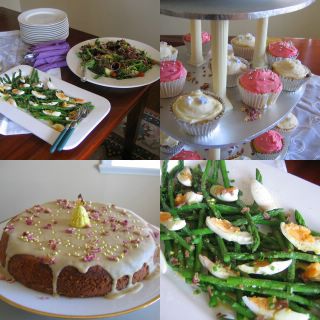
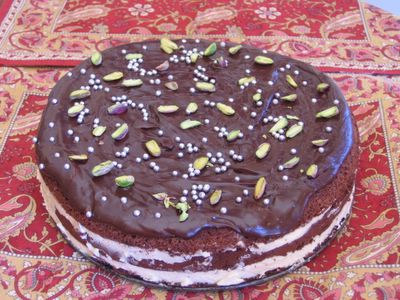
Scatter with gold sprinkles, nibbed or chopped pistachios.

Well the effort for me was in repeating that recipe here ( I have just found the energy to re-edit all the spelling mistakes out) because given it was made over two days I didn't find it too onerous. It was also a huge hit, so well worth the effort.


Sunday, September 10, 2006

Rain, Sunday, shopping and scones


Scones, jam & cream and some gabi fingers on the side

Apart from all the posting I have been doing today I also decided to go shopping. I went to my fav delis on Deshon Street East Brisbane, and picked up things like half a huge wedge of brie, some Italian Grana Padano, our chillie sauces which eggs for brekky are boring without, some pastizzis (pea and anchovy plus some apple ones), pappadums and parathas and because I needed some coriander for the curries tonight, I had to spend $10 to use my credit card and bought "The Grange" Boysenberry jam.

Once home, due to my searching of food blogs this morning, I couldn't quite forget Vicious Anges' use of a Bill Granger recipe for scones. Being a Bill Granger fan I would have to say his recipes are never fail I had to give them a go. Considering two other things I had made this weekend were a flop, I needed one sure fire hit. I messed up some apricot slice, I burnt every single apricot piece but not the biscuit strangely enough. And the ice-cream slice, well the slice wasn't as cold as it should have been when I sandwiched the icecream which meant I lost a lot of great icecream due to melting from the heat.

I am happy to say these scones redeemed me:

Preheat oven to 220c

11/2 cups of plain flour
1 tablespoon icing sugar
1 1/2 tablespoons baking powder
250mls milk
30g melted butter

Makes about 8-10.

Sift the dry ingredients and add the other two slightly mix together, ditch the spoon and use your hands and bring dough together. Once together move to floured surface and knead gently. Roll out to about 3cm deep and using a 5cm round object like a glass cut out circles in the dough and move to a tray which you have either greased or being slack like me put some baking paper on.

Push the bits of dough back together roll out again and cut scones - do this again till dough is finished.

Put in the oven for about 20 mins, or 15 if your stupid oven is as hot as mine.

I served mine with lashings of whipped cream, said jam purchased above and for a touch of the traditional some fresh strawberries. Elliot couldn't wait to get his mouth on them. I made some tea with real leaves and poured tea for all of us and served it in the K&K "good room". It was sweet!

Eager for some scones

Girl Overboard


Pizza Fritta (Fried pizza)

Okay I don't post for months, there are some who have wiped me completely I don't blame them.

But hey I am actually doing this for me so if per chance someone wanders by then, well I hope they find something new that appeals.

I made these fried pizzas one night for a dinner we served to P's cousin and her husband. The full meal involved some gorgeous lamb shanks and couscous, I think the lamb shanks had some mediterraneon flavours, harrissa and preserved lemons and prunes etc. Deeeevine. Oh and a Torte Della Nona (recipe in another 4 months - Ha Ha Ha - oops I may not be joking!)

I didn't want to do starters and an entree as such so I opted for some fried pizzas which Jamie Oliver's Italy cookbook inspired.

I have been making my own pizza dough for some time now. The recipe is via this blog

Pizza Dough , courtesy of The River Cottage Family Cookbook.
Dough:

500g bread flour
2 tsp salt
1 sachet dry yeast (fast-action)
2 Tbsp olive oil + more for greasing the bowl
2 tsp honey or sugar300 ml (approx) of warm water

Put a small pan of water in the oven. Turn the oven to about 150 c. for about 15 mins then switch the oven off. (All will be revealed this will save lots of time in the long run)

Mix the flour, yeast and salt into a big mixing bowl. Mix olive oil and sugar/honey into a mixing jug and top up with warm water to just over 300 ml. Stir well to dissolve the sugar/honey.

Make a well in the centre of the flour and slowly pour in the oily water. Mix and then knead until soft and elastic.

Wash out the mixing bowl and brush with olive oil. Place the dough inside the bowl and cover with alfoil. Put the dough in the oven (which has been switched off). Leave in this nice humid environment for about 20 - 30 mins and check - remove when the dough has doubled in size.

Tip the dough onto a floured surface and knead for about 5 mins.

Turn your grill on really high.

I decided to make the pizzas rustic like jamie so I divided the pizza dough into about 6 balls and rolled and stretched it out - no perfect circles thanks.

Heat up some olive oil in a heavy fry pan, my Le Crueset frypan was perfect for this. Place the pizza dough in the pan and cook on high about 30 seconds on each side.

Remove from pan and place on a tray - then keep it simple with the toppings.

I nearly always use passata for the base (too lazy to make a sauce) and mainly boccincini for the cheese. Then use some fresh basil, sometimes pepperoni, anchovies and sometimes some spinach, prawns and pesto.

When topped move tray under the grill and cook under cheese is bubbling.

My experiences with home-made pizza: the fried pizzas are great for serving to guests as a starter where you prep before guests arrive as the pizzas can be grilled quite quickly and served.

I have found that nothing works better for a nice crisp base then an electric pizza oven, I hope Santa brings me one for Christmas. I got to try my father-in-laws recently. The pizza cooks quite quickly about 5mins but you do have to be on top of it all as the dough has to be rolled out and put on the pizza oven then topped.

So the family are eating while your working but it is worth the crisp base, which I just cannot get in the traditional oven.

Chocolate Malteser Cake


Chocolate Milo cake


I made this cake for work some time ago. It is from Feast and is Nigella's Chocolate Malteser cake. I decided not to use Horlicks and used Milo instead, and thought it turned out pretty well anyway.

Here it is with my message made by melting chocolate in a little zip lock bag and snipping off the edge and writing on some grease proof paper:


I would have to say that this is one of the easiests cakes I have ever made and they looked pretty perfect when they came out. The kiddies loved this cake when I made it the second time with just the maltesers so it will no doubt become a standard.


Here goes:

150g soft light brown sugar
100 g caster sugar
3 eggs
175ml milk
15g butter
2 tablespoons Milo (or Horlicks)
175g plain flour
25g cocoa, sieved
1 teasp baking powder
1/2 teasp bicarb soda

Sweet stuff for the middle and the top:
25o g icing sugar
1 teasp cocoa
45g Milo
125g soft unsalted butter
2 tbsp boiling water
80 g Maltesers

Preheat ovn to 170c. Butter and lline two 20cm loose bottomed sandwich tins ( i didn't use loose bottomed pans and I thought it turned out well)

Weight out dry ingredients. Heat the milk, butter and milo in a saucepan until the butter melts, and it hot but not boiling. Whisk together the sugars and eggs till light and frothy, beat in the hot Milo mixture and then fold in the flour, cocoa, baking powder and bicarb of soda. Divide the cake batter evenly between the two tins and bake in the oven for 25 mins, by which timethe cakes should have risen and will spring back when pressed gently. Let them cool on a rack for about 5-10 mins then turn out of their tins.

In a food processor, add the icing sugar, cocoa and milo, blitz then add the boiling water until you have a smooth buttercream. Sandwich the cold sponges with half the buttercream, then ice the top with what is left, creating a swirly to rather than a smooth surface. Stud the outside with maltesers.

Goose fat potatoes


Nigella's perfect potatoes

1 jar of goose fat
About 1 kilo of medium potatoes
2 tbls semolina

I found the goose fat in a deli only $14 a jar! Peel the potatoes and cut each one into three by cutting off each end at a slant so you are left with a triangle in the middle.
Put the potatoes into salted cold water in a saucepan and bring to a boil - cook for 4 mins. Drain the potatoes in a colander and then tip back into the saucepan, sprinkling with the semolina and some salt. Shake the potatoes around to coat them well and, with the lid clamped on, given the tin a good shake so their edges are fuzzy.

Empty the goose fat into a large roasting tin and heat in the oven until very hot. Then tip the semolina potatoes carefully into the hot fat and roast in the oven for an hour or so until they are darkly golden and crispy, turning them over about halfway through.

Nigella says you can drain off the oil and let them sit in the pan in the oven till the last minute.

My very first roast beef and yorkshire pudding


This winter I finally got to make a roast beef. Some good friends left to go live in Tassie so to appropriately farewell them, I decided to do the most classic of all roasts. I bought an expensive rib on the bone. I almost didn't post about it, mainly because the roast is overdone - I really wanted medium rare, but it was well-done.

Nevermind it was pretty fantastic, expensive meat means you never really make a mistake.

I have to say that this roast took alot of planning due to the timing of the various ingredients. One smallish oven though means alot of juggling. The beef approximately 60 mins on high, yorkhire puddings 20 mins on high, the roast potatoes 88 mins on high (44 mins per kilo), green beans and an red onion gravy (made earlier) all from Nigella of course.

Given the state of the meat, I think it is really only worth giving the recipe for the yorkshire puddings and the roast potatoes.


Yorkshire pudding (from Feast)

324 ml semi skimmed milk ( i used full cream I don't think it made a difference)
4 eggs
1/2 teaspoon salt
250g plain flour
12 x 1/4 teaspoons beef dripping or vege shortening. (I found the dripping about $1 so why not!)

Whisk the milk, eggs and salt well and let stand for 15 min, then whisk in the flour and let stand till you need it.

Cook at the highest temperature. Put a muffin tin in the oven to heat up a good 10-15 mins, with a 1/4 teasp of drippin in each compartment.

When the pan and the fat is hot, pour in the pudding batter for 15-20mins or until they have puffed up gloriously so Nigella says.

Lea's 40th birthday lunch

It is not the spring morning I thought it would be when I planned yesterday to make some brunch and head with P and the kiddies to our nearest park. The plan was, to lay down with the Sunday paper and watch the kiddies scamper around the playground.

Instead the strangely grey day has prompted me to spend some time on my much neglected posting while I have a nice butter chicken curry simmering gently on the stove - an Elliot special request for dinner this evening. I have felt quite guilty as word keeps getting back to me that more and more people at work now read this food blog.

I keep telling them I am still cooking and baking just not getting this far and choosing pictures, posting and writing. When was the best time for me to be doing this, the past four weeks while we have been in caretaker mode at work. Doesn't mean we don't have things to do, just means we don't have as many things to do at once!

This collage is of a lunch I had about two weeks ago at my place. I was on holidays after having returned from Melbourne and the Sunshine Coast and had the energy to spend my weekend cleaning and planning and cooking.

The entire lunch was as follows: Antipasto brought by one of my lovely sister-in-laws. It makes life so much easier when your feeding 12 adults and 5 kiddies (we were missing 4 kiddies who spent the day doing something else). My brother-in-law brought some sausages and we did a sausage sizzle for the kiddies. These lunches are for the kids to play and the adults to indulge in gourmet delights. Because once all those kiddies are together they focus on playing and the birthday cake.

The kids are welcome to the adult food but really they are way too busy and don't bother us at all. If your worried about their eating, don't. These family functions are not to force vegies into them that's what discrete family dinners are about away from the glare of the public. They often enjoy the Antipasto anyway so never go hungry on the day.

I wanted to make it super easy - so I bought a huge butterflied leg of lamb (about 2.3kg) the day before, and in my pestle and mortar bashed up lots of garlic, sea salt, pepper and rosemary and olive oil and rubbed it all over the lamb. It stayed in its marinade overnight. Then the next morning I removed it from the fridge and brought it back to room temp, before P took it to be barbecued. It was great for a group because one its cooked you thinly slice and serve with salad and potatoes and in this case a gorgeous mint pesto. Sorry no piccies of the lamb or the pesto, but I will write down the recipe for the pesto because I will definately be doing that one again.

The potatoes for this lunch were my Greek potatoes that I have done many times previously. The thing about Greek potatoes is that while the potatoes are in your oven baking they send out waves of gorgeous carmelising onion and garlic, whetting the appetites of all those arriving.

I was feeling particularly springy and decided to make the asparagus and egg salad from this month's Delicious magazine. A true hit, that salad went in the blink of an eye! In addition there was a simple garden salad.

Finally I got to make Nigella's Winter Plum Cake - because one of the principal reasons for going to Melbourne was buying Billington's golden icing sugar something I have found difficult to source here.

In order to have something appealing for the kiddies for dessert I made the cup cakes as well.

Gabi and Winter Plum Cake


I was inspired by Niki making this cake some time ago, and waited till I could get the brown icing sugar for this cake before I made it.

Winter Plum Cake (How To Be A Domestic Goddess - Nigella Lawson)

575g tin of red plums - I can't find them so I used the approximately same amount from a 1 kilogram bottle of Goulbourn Valley red plums
125 grams self-raising flour
1/2 teaspoon baking powder
75 grams ground almonds
125 grams butter, softened
125 grams light brown sugar
2 large eggs
1 scant teaspoon almond essence

20 cm Springform cake tin.

For the icing:160 grams unrefined icing sugar1-2 tablespoons hot water

Preheat oven to 170 c (mine is very hot so I had used about 150).

Line and grease the cake tin. I am so lazy when it comes to this part I have taken to spraying the sides with canola oil and it works just as well!

Drain the plums, remove the stones and broke them up in the process and leave in a sieve to drain.

Mix the flour, baking powder and ground almonds.

Cream the butter and sugar, then beat in the eggs one at a time, adding a tablespoon of the flour mixture after each one.

Beat in the almond essence ( I think the essence is optional) then fold in the rest of the flour mixture and the drained, chopped plums. Turn into the prepared tin and bake for about 1 - 1 1/4 hours ( I only went to 45 mins its this super hot oven of mine!).

Remove from oven, cool in its tin for about 10 minutes, then turn onto the rack.

When cool, ice with brown-sugar icing. Mix the sieved icing sugar with water till you have a caramel-coloured shiny paste. A word about this icing sugar, Nigella says that no other icing sugar works so I took her at her word and refused to make it prior and I think it was well worth the wait.

Pour over the top of the cake to cover thinly, and leave to drip down the sides - I couldn't resist using some gold cachous also purchased at the Essential Ingredient in Melbourne. I found some gold ones at a store here but they were so expensive I gave them a miss.

I also added some dried rose petals (dare I say also obtained in Melbourne at the Essential Ingredient). When I took this cake to work recently it had a distinctly Middle Eastern flavour due to the almonds and rose petals which worked quite well.

asparagus, egg & anchovy salad


Asparagus, egg and anchovy salad courtesy of Bill Granger in Delicious Magazine

Soft boil three eggs. Blanch two bunches of asparagus in some salted water for 2-3 minutes, then plunge into cold water.

Arrange asparagus and eggs on platter. Finely chop about 4-6 anchovey fillets and scatter over eggs and asparagus. Make dressing from 2 tbs olive oil, 1 tbs of lemon juice and 1 tsp Dijon mustard - whisk together, season to taste. Drizzle over assembled salad prior to serving. Finely chop chives and garnish salad.

Mint pesto

2 bunches of mint (it was such a hit I wish I would have doubled this)
parmesan cheese
garlic
canola or olive oil *

Unfortunately I don't measure my ingredients for pesto. I just grab my pestle and mortar and fill it with the mint leaves, grate about 1/4 cup of parmesan and 1 large clove of garlic.

With the toasted pine nuts, I guess I added about 3 tablespoons. Generously splashed some oil in and started bashing away. Sometimes I want a runny pesto with a finer grind sometimes I do not.

This pesto was fairly thick and coarse, my brother-in-law was bashing it while I oversaw it.

If I had have made it all myself I think would have thinned it a little more with some oil.

*(I don't necessarily think you always need to use olive oil for pestos. I am fairly fickle when I am making them I switch between canola and olive. I think if I want the herb flavour to be truly the principle one, I tend to use canola)

Saturday, May 20, 2006


spatchcock

Tuesday, April 25, 2006

Rocky Road


Another Easter of way too many chocolate bunnies and eggs for the kiddies, so what to do with the excess. Last year it was chocolate chip cookies, but this year I decided to create this rocky road. I haven't a clue about the quantity, let me see...

two gigantic football eggs,
2 doz small chocolate egg size eggs,
two bunnies,
other assorted eggs & bunnies

all melted in a large bowl on a low heat in the microwave. Once melted I added:

Shredded coconut - approximately half a packet;
a packet of unsalted peanuts 200grams?;
turkish delight - about 200 grams (could have done with more of this too!);
marshmallows 1/3 of a very large packet (should have used more).

I lined a 9cm cheesecake tin with a freezer bag which I cut in half and poured my RR into that and rechilled in the fridge for about an hour. I turned it out on to a board and chopped into into nice big chunks.

Those chocolate eggs are much more palatable now and very morish - maybe I shouldn't have found something that we enjoy more than plain chocoate.

Saturday, April 22, 2006

Fish Pie


Easter Sunday Fish Pie

I spent last Sunday night at my mother's place. I decided that as she had looked after my children for the week, I would make at least two meals in return for the favour. The first meal on Saturday night was home-made pizza, and the second meal was this Fish Pie.

I found the recipe for this pie, some time ago, in Nigel Slater's appetite and kept waiting for the exact right time to make it. Well, the exact right time should really have been Good Friday, however we had to go to a birthday party and not being strict observers we ate what was on offer, which happened to include non-fish dishes.

So I took the next opportunity and late Sunday afternoon, started work on this pie. It uses smoked cod, mussels and some gorgeous big prawns that mother bought. Being the wonderful comfort food that it is of course it used some creamy mash potato. I decided to combine my mash potato with some mashed pumpkin as well. I also embellished the top of the pie, with some left over baby mozzarella, and anchovies from the previous evening's pizza toppings.

It was a lovely meal, served simply with the peas, and I managed to cut down on the time consuming steps by using some frozen New Zealand mussel meat rather than the fresh ones in the shell. I think it is to be enjoyed with a lovely musty white wine, but not that night unfortunately for us.

I thought that this pie was a rather heavier and more comforting version of the seafood chowder I made not long ago. Except you bake it and put the potato on to much like a cottage/shepherd's pie. I have decided my winter repertoire will have to include either of these dishes from now on as they certainly satisfy my desire for seafood and lots of it. I probably get the seafood urge about every eight to twelve weeks - and it has to be a seafood marinara - blanc of course, or now the chowder or the pie.

Recipe (adapted from Nigel Slater's appetite)

Mussels (500g frozen NZ mussel meat)
white wine ( a glass full)
smoked cod 1 kg
bay leaves 2-3
milk 500ml
butter 50g
plain flour 4 tablespoons
parsley
green prawns 500g peeled

potatoes - 4 large
butter

I defrosted and cooked my mussel meat in the white wine for about 5 minutes. Remove the mussels and reserved the white wine.

Put the smoked cod into a saucepan with the bay leaves and added milk and some water to cover the fish. I brought the fish and milk to the boil and then let it simmer for 5 minutes.

Test the fish by seeing if the flesh can be easily pulled from the skin and then remove the fish from the milk and pulled the flesh apart into large chunks, check for and remove bones and skin. Set the fish aside and reserve the milk.

Peel the potatoes, and cut into large chunks. Boil the potatoes in some salted water till they can be pierced easily with a fork. Mash the potatoes adding some butter and the reserved fish cooked milk, mash till fluffy. I also mashed some pumpkin and combined it with some potato to give it some structure.

Melt some butter in large pot (suitable for the oven and stovetop) Stir in the flour, letting it cook over a low to moderate heat until it is biscuit coloured and nutty. Pour in the wine reserved from cooking the mussels, and the rest of the milk from the smoked cod, then leave to simmer with a regular stir to stop it catching, for ten minutes.

Turn on the oven to 200 degrees Celsius.

Add the fish, mussels and prawns to the large pot and grind in lots of black pepper, check seasoning and add some sea salt if necessary. Add some finely chopped Italian parsley - I like lots.

Pile the mash on top of the fish mixture. It will sink a little, but the top can be smoothed with the flat side of a spoon.

I topped mine with a few anchovies and the baby mozzarella and baked for about 50 minutes. It is to be expected that the luscious seafood sauce will ooze and bubble to the top of the pie.

Serve simply with some peas.


Fish Pie

Monday, April 17, 2006

Nanaimo Bars


I have been tempted to make these Nanaimo Bars for ages. I found them on my favourite place on the web its certainly becoming a habit. Then I have had the ingredients in the cupboard for about four weeks but I guess the main impetus for finally making them, has been the fact that my sister and her son are in Vancouver at the moment.

Her visit is bringing back memories of when P and I were in Vancouver and when I first tried this slice. I can recall it was very sweet, I guess that means it fulfils its purpose. But I have always thought that maybe something is missing, like peanut butter or caramel. Nevertheless I will make them again, I love that they are such a regional slice that few people will get to try here in Brisbane or remember them unless they have spent a little time in British Columbia as we did.

The link above will get you through to the recipe, however as this is a reference resource for me too I will replicate the recipe.


Nanaimo Bars
Ingredients bottom layer:
1/2 cup (1 stick) (113 grams) unsalted butter, room temperature
1/4 to 1/2 cup castor sugar
1/3 cup (30 grams) unsweetened cocoa
1 large egg, beaten
1 teaspoon pure vanilla extract
2 cups (200 grams) Granita crumbs
1 cup (65 grams) dessicated coconut
1/2 cup (50 grams) pecans, coarsely chopped

Method bottom layer :In a saucepan over low heat, melt the butter. Stir in the sugar and cocoa powder and then gradually whisk in the beaten egg. Cook, stirring constantly, until the mixture thickens (1 - 2 minutes). Remove from heat and stir in the vanilla extract, biscuit crumbs, coconut, and chopped nuts. Press the mixture evenly into the prepared pan. Cover and refrigerate until firm (about an hour).

Ingredients Filling:
1/4 cup (56 grams) unsalted butter, room temperature
2 - 3 tablespoons milk
2 tablespoons vanilla custard powder
1/2 teaspoon pure vanilla extract
2 cups (230 grams) icing sugar

Method filling: Cream the butter. Beat in the remaining ingredients. If the mixture is too thick to spread, add a little more milk. Spread the filling over the bottom layer, cover, and refrigerate until firm (about 30 minutes).

Ingredients topping :
4 ounces (115 grams) semisweet chocolate, chopped
1 tablespoon (14 grams) unsalted butter/copha

Butter (or use a cooking spray) a 9 x 9 inch (23 x 23 cm) pan.

Method top layer : In the microwave melt the chocolate and butter/copha. Spread over the filling and refrigerate.

TO SERVE: To prevent the chocolate from cracking, using a sharp knife, bring the squares to room temperature before cutting.

Soft Polenta, parmesan and baby spinach.

Monday, March 13, 2006

Chorizos and broad bean with ciabatta


This is one of those anti-pasti dishes, I made during our month long entertaining stint recently. It was a huge hit with my FIL and it served as our entree along with a host of other tasty treats for a couple of the feasts.

I found the recipe in a book I received from my SIL, about 4 years ago and it is one of those books that I have found it difficult to find inspiration, but no more I think it is all a matter of timing, and last summer it was all about mediterranean style starters from this book "The Mediterranean Collection" by Louise Pickford.


250 g shelled broad beans fresh (or 1 packet frozen broad beans)
125g spicy chorizo sausage
1 tablespoon olive oil
2 garlic cloves, roughly chopped
1 tablespoon chopped dill
1 tablespoon chopped mint
juice of 1/2 lemon
salt and pepper

I also used about 1 teaspoon of smoked paprika.

I had to use frozen broad beans rather than fresh, so it was a matter of taking the outer shell from the beans - and a frozen packet is quite a few more than the fresh I think?

Cut the sausage into slices about 5mm(1/4inch) thick. Heat the oil in a frying pan, ad the garlic and fry gently for 2-3 minutes until softened, then discard. Increase the heat, add the sliced chorizo and stir-fry for 2-3 minutes, until it is golden and has released some of its oil.

Stir in the beans and cook for a further 2-3 minutes then add the herbs, squeeze over the lemon juice and season to taste with salt and pepper. Serve warm with some freshly baked turkish bread.

Saturday, March 11, 2006

Too much panettone - Bread and Butter pudding


I actually made this B&B pudding about 2 months ago, when I tried to finish off the seemlingly never ending loaf of panettone I had purchased at Christmas.

I was the only one who enjoyed using the panettone as french toast, so in order to finish it up, I had to find another way to serve it.

As it turned out, again I was the only one to enjoy this dessert. P and Elliot not being big baked bread fans and all, and Gabriella - well she is just down right fussy at times.

The recipe was one I just decided to make up and I drew my inspiration from Nigella and "Feasts".

The pudding had a lovely orange flavour which was due to the orange peel component in the pannetone. All up I thought if you love this style of comfort dessert it is well worth making.

My B&B

butter for greasing
8-10 slices of panettone
butter for the panettone
The Grainge Raspberry jam (the best as far as I am concerned)
2 tablespoons caster sugar
6 eggs
500 mls double cream
1 teaspoon pure vanilla essence
250 mls milk
1/4 cup of sultanas (not an option if your me)

Preheat the oven to 170c.

Butter a 2 litre dish.

Spread the pannetone with butter and jam. Place the pannetone in the dish and squish it all into the layer.

In a bowl whisk the sugar, eggs, cream and milk add the vanilla essence. Pour over pannetone and leave to stand 15mins.

Reduce the oven to 150c and bake for 45 mins - 60 minutes. Before taking out of the oven check that the custard has just set.

Best served warm with some vanilla ice-cream.

About Me

My photo
Mother of two with one of each. Wife of one.Dogless. Busy working five days a week, baking and cooking when time allows. Writing rarely these days. Wishing I had time to read more often.